Well, the restoration of the 1980’s Ross bike is coming along. I’ve been doing a little bit at a time, mostly as parts come in.
Ordering parts for a bike this old online is sometimes a crapshoot. What you can find online is almost universally poor in the descriptions. Dimensions, if given, sometimes lie. I sit in front of the computer with an old part, measure it with calipers, and make my best guess which part to buy.
 My first mistake was a new quill stem – the piece that holds your handlebars and goes down into the fork. I wanted to change it because the old one was never long enough for me. It was both too short and too low. I wanted to bring the handlebars further out in front of me as well as raise them up. I thought I found the part and ordered it. It came in and was beautiful, an adjustable angle and longer than the old one. But it didn’t fit. It was 1 mm too thick to go into the fork tube.
Over the years, tubing on bikes has gotten bigger and bigger. The bikes from the 70’s and 80’s often had a inside diameter steerer tube of 21.1 mm. It was common with Schwinn, Ross and some other brands. The piece I got was 22.2 mm. Close, but not going to work.
 It turns out it’s a common problem restoring old bikes and while you can still find a stamped and rolled steel cheapie piece, an alloy one is rare. But there was a solution. What they call threadless stems are all the rage both for road and mountain bikes. My Trek MB has one. The steerer tub has no threads, hence the name, and the stem clamps onto the tube to hold the bearings and raceways together. Spacers are used to adjust the height and excess steerer tube is just cut off.
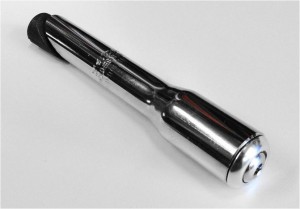
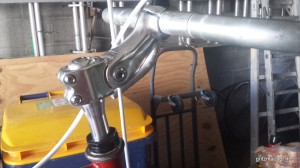
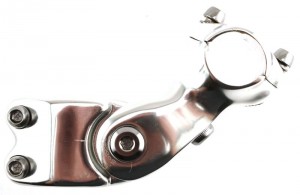 I found an adapter post that fit the 21.1 mm tube and had a thicker top part that lets you clamp a threadless style stem onto it. Two pieces to do the job, but I found an adjustable angle stem that would let me raise the bars to my liking. Of course each piece came from different sources and arrived in their own sweet time. But the handlebars are now all together and waiting for some tape.
 I had a broken axle in my rear wheel that I needed to replace. Despite careful measurement, what I got was the wrong size. I ended up going to a LBS (Local Bike Shop) where the guy behind the counter spent half an hour sitting on the floor, rummaging through bins looking for the part. He had it and finally found it. I might not have spent a lot of money, but I found a shop that I like. The three guys working there were sympathetic to my project and seemed genuinely interested. I’ll be back to spend more money there.
I reassembled the wheel bearings on the new axle after cleaning it thoroughly, only to find out that the hub flange was cracked at a spoke hole. I had two sets of wheels for this bike and both had had damage to the rear spokes from a chain crash into the wheel from overshifting past the largest cog.
 So, I didn’t want to invest any more work into this wheel. Even truing it up and replacing a few of the bad spokes would still leave that bad hub. I looked at the other wheel and it was not as nice a rim, although the same brand. (Mavic) I looked into a new wheel, but there were very few choices in 27 x 1 1/4″ anymore. I couldn’t get anything near the quality of what I had at all and a custom build would be big bucks.
The wheel with the broken hub was a nicer rim, anodized and still fairly true. I looked at the other wheel, which was a plain alloy rim, but the hub was actually better than the other. It was thicker at the spoke holes and had sealed bearings. I didn’t realize that and I’ve never worked on them before. I took the axle all apart to see if there was anything I could do, maintenance wise, but other than cleaning the rust off the outside it’s zero maintenance. I got the bearing information and ordered a new set. It looks like replacing the bearings will be a easy and quick job. But for now the ones in it are fine.
So, I investigated taking the wheels apart and rebuilding one with the good hub and the good rim. It turns out, it’s a lot easier than starting from scratch. I’ve always wanted to try building a wheel, but never had the courage.
The way it is done is to take the wheel with the rim you want apart. Then place it beside the wheel with the good hub. You simply undo one spoke at a time and transfer it from the hole in one rim to the hole in the rim next to it. I tied the new rim to the old on with nylon wire ties to keep things lined up.
As I disassembled the one wheel, I kept the spoke nipples and worked on one side at a time, keeping the long and short spokes separated. Rear wheels have two different lengths of spoke, due to the space the freewheel takes up. I discarded the damaged ones on the outside of the threaded side of the hub, but kept the inside ones to replace any damaged ones on the other wheel. Then I took the other side apart, keeping those spokes as well, just in case.
The other wheel had quite a lot of corrosion on the nipples and the ferrules at the spoke holes. It was good that I was getting rid of that rim and I decided to use the nipples from the disassembled wheel. With the two rims side-by-side, I started with the freewheel side outer spokes, many of which were damaged, removing them and replacing them with good ones from the other wheel. All the spokes were stainless, double-butted spokes, so they were quality spokes. I inserted them into the new rim in the hole that corresponded to the one I took out. Next, I did the same for the inner spokes. Inner-outer, up or down, that refers to the direction that the spoke is inserted through the hub and which side of the hub the spoke’s head goes on. If you look at a wheel, you’ll see.
I finished all of the freewheel side spokes and it looked good. I ran the nipples in until the end of the spoke came into the screwdriver slot inside the rim. Then I worked on the flip side, although I did not flip the wheel, I kept working from the same side. I did every other spoke so that I didn’t end up with all the spokes on half the rim still in the old rim. It probably didn’t matter, but seemed prudent. I ran short of nipples. There were one or two from the old wheel that were chewed up or wouldn’t thread on right, so I did use a couple from the other wheel. They were just a bit shorter.
So how did it turn out? Pretty well, I think. I put the wheel into the bike and spun it around. It wobbled, of course. In fact, enough to hit the frame. But I made adjustments and got it pretty good. I added a lot of tension to the wheel, going all the way around and giving every spoke a full turn. That and adjusting some of the wobble out got it pretty good. There is a slight low/high spot as well, but not too bad. It could be ridden as-is without any trouble, but I want to get it to a pro who can put it into a truing jig and get it just right.
At this point, I’m waiting for a chain and pedals to arrive and I’ll be ready to give it a spin.


I dropped off both wheels at a LBS today. I went to one that has a reputation for doing good work on wheels. It’s a shop that specialized in all the fancy, multi-thousand dollar exotic bikes that the lycra-clad crowd ride.
I’d never been there before, so it will be an experience. The building was pretty fancy. I expected an older, re-purposed building, like an old gas station, but they clearly had this built for them. Must be good money in carbon fiber.