 This project has grown. See this page for more details.
I’ve been spending a huge amount of time working on the weather station and I needed to take a break. The Weather station is coming along nicely, but I’m waiting for a few more parts. I decided to work on another project.
A while back, I picked up a strip of RGBW leds in the Neopixel format. We used them to develop some code and ended up putting some Neopixel bars on the Warlocks 2017 robot as signalling devices. So I had a meter of 30 LED/m Neopixels on hand. I had an idea that I wanted to put them on my recumbent trike, but hadn’t decided how to go about it yet.
I’m not a big fan of flags on trikes, or any bicycles. I don’t buy the conventional wisdom that “You’re so low to the ground. Nobody can see you.” That’s a cop out and blames the cyclist for the motorists shortcomings. If you can’t see a low bicycle, how can you see the lines on the road, and why did you slam on the brakes and put your car in the ditch when a cat ran across the road? So, I’ve decided flags are ineffective and not worth the bother 90% of the time. Increasing your visibility by positioning in the road and with bright warning lights are more productive.
But I did have a couple of fiberglass bicycle flag poles kicking around.
So, if flags are meh, but lights are good, why not fill a flagpole with lights? Challenge accepted.
I’ve tried this before, with individual surface-mount (tiny) LEDs and I even got a couple sets that someone was selling. They were less than spectacular. Not bright. Ate batteries. And winding a wire around a fiberglass pole was a little wonky and unattractive.
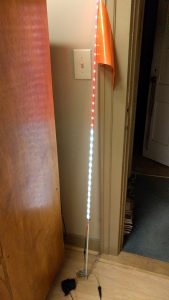
But the Neopixel strips were nice. If I could attach them to the pole, they’d make a great light. I had a one meter length, which left about 18 inches of the pole at the bottom with no LEDs. Perfect. I used some clear silicone caulk to attach it to the fiberglass pole. So far, it’s a go. It’s flexible, it’s clear and so far holding it to the pole well.
So, the LED strip requires a driver. I had it working with an Arduino Uno, the standard Arduino building-block. I had made a shield previously with the handful of components to interface with the LED strip. I gave it it’s own 5v regulator to let the one on the Uno coast.
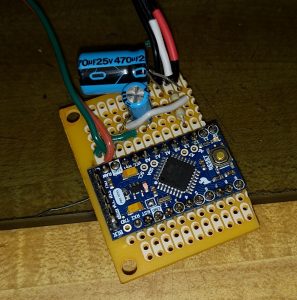
But that’s a big package, about 3″ 2.5″ x 2″ plus I needed a battery. But I knew what to do. I used a Arduino Pro Mini which is almost 100% compatible with the Uno, but the size of a postage stamp. I’d used them for a couple of other projects, so it was a natural choice. I was able to shrink the whole thing down to fit in a little plastic jewel box that I had lying around. For a battery, I had some extra Li-ion battery packs from bike headlights that were perfect for this. They were 7.2v nominal, which means close to 8v fully charged. And they are ready to mount on a bike. I had replaced them with some better packs for the headlights I have, so they were just spares.
 I
I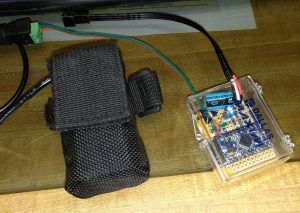 had worked on the code and developed some pretty cool patterns for bicycle use. It ran on the Uno perfectly as I wrote it and transferred to the Pro Mini perfectly. All I needed to do was change the I/O pin because I used a different pin to make the layout easier. When I built up the little perf-board, I had the processor programmed and ready.
Here’s a couple of pictures of the circuit. I have video of the pole to post soon as well.
What I ended up, is pretty spectacular, better than I expected and really bright. It runs for at least several hours on the battery. I actually haven’t measured how long it lasts because I have been making a lot of program changes, which supplies power from the USB cable.
There are (as of right now) 20 different patterns which play for 30 seconds each at random. I’ve given some thought to ways to select patterns, but will leave that for the future. There is a selection of them in the videos.
Here’s the code: (download) (Latest Code is now archived)