Temperature is indoors, in fact sitting where the fan blows hot air out of my laptop, although, I am starting with testing outdoors. Also, sometimes the breadboard system is running, other times, the final prototype is reporting in. You might see some weird charts because of that. (I wish we were having 80-degree weather!) Barometric pressure is pretty universal, though.
See more charts at ThingSpeak…
I have been playing around with some Arduino projects and have been building a weather station. I have a lot to share about the construction of that project and will place it here when I get time to write it up. It has not been a straightforward journey. Check on down to the bottom to see if anything new has been added because I am expanding this post rather than making new posts about it.
Until then, some pictures.
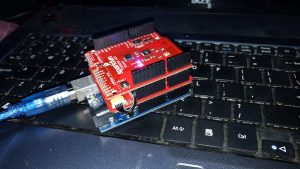
Nice little package, if only it had more memory.
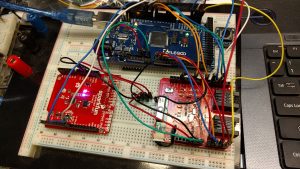
This is how it started out. An Arduino UNO with two shields stacked on it.
A Sparkfun Weather Shield which provides temperature, humidity, barometric pressure, and light level sensors. It also has the interface for wind speed, wind direction, and rain fall measurement. The other shield is a Sparkfun ESP8266 wi-fi shield, which provides a connection to the internet.
The plan is to have no wires coming in from it. It will somehow report it’s data wirelessly.
 I found the anemometer, wind vane, and rain gauge online. It’s amazing what you can get from China these days. These were “replacement parts” for an expensive commercial weather station. I found the anemometer, wind vane, and rain gauge online. It’s amazing what you can get from China these days. These were “replacement parts” for an expensive commercial weather station.
A little work with some PVC pipe and voi-la! I think I found these on Amazon. A tip on a post by someone else led me to them. Sure was a lot easier then building my own… |
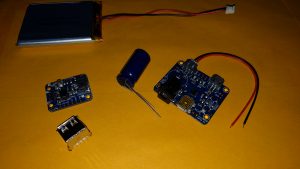
Components for the solar charged li-poly power supply. Adafruit Powerboost 500 Basic and Adafruit Solar Li-poly charger. 2500mah battery.
Since the plan is no wires, it needs its own source of power. These parts, a lithium polymer battery, a charging circuit with an input for a solar panel, and a circuit to step the 3.7v battery up to 5.0 volts to power the Arduino are shown here. I have a nice weatherproof box to put them all in, but that’s probably going to be the last stage of construction.
The solar panel is still undetermined. I have cells left over from the panel I built a couple of years ago, but building a panel for 6v with them will end up being about 2’x2′ I’m not sure I want that much of a wind catcher mounted on the weather station. A smaller panel will probably be enough, but they are a bit pricey.
The original shields from the Uno breadboarded to a Mega2560 to figure out how to make it all work. I have two Megas so I can work on the software with this, while I work on the packaging of the new shield with the other. They work with the same program, other than a couple minor differences, so I can transfer it to the final project.
As I added features, I kept pushing the limits of the Arduino UNO, until it was apparent that I couldn’t make everything I needed work without running out of memory. It was close and I tried every trick I could to cut out anything unnecessary, but once the wi-fi was added, it exceeded the 2048 bytes it had.
The answer, I thought, was to get the Arduino MEGA2560. It has the same form factor, just longer with some more headers added.
Regular Arduino shields would plug in and I thought I could use the weather shield and wi-fi shield that way. Wrong.
While the pins match up, mostly, what you can do with them doesn’t. For instance, the wi-fi board talks to the processor over a serial interface. On the UNO a software serial port was configured on pins 8 & 9. But on the Mega, the software serial drivers wouldn’t work on those pins. I had to move it up to 10 & 11. No problem, but it means I can’t just plug the board in, unless I modify it. Then the library for the wi-fi module has no way to tell it to look someplace else for its serial port. I had to hack the library file to make it work. That means, if I ever use the same library for another project, I will have to edit the files again.
The GPS on the weather shield was a similar story. It used software serial on pins 4&5 on the UNO, which I had to wire to pins 18&19 on the Mega, which is a hardware serial port. I was able to tell it to use Serial1 instead of a software serial, so that worked out. But again, the board can’t be plugged in without some major modifications.
And on it goes… Right now, I’m having problems with the wind and rain inputs, which worked perfectly on the UNO.
Anyway, to solve the interconnection problems, I am waiting for a breadboard shield to fit the Mega to arrive. I also have coming individual sensors that I will put on that shield and recreate the Uno weather shield but for the Mega.
Another update:
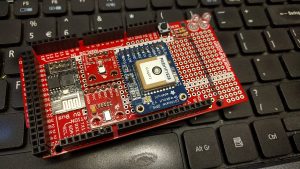
Mega Shield (Sparkfun) with ESP8266 wifi module, temp/humidity module, temp/pressure module (both Sparkfun) and Adafruit Ultimate GPS Breakout. Hidden under the wifi module is a Adafruit logic level converter.
The Mega breadboard shield and some of the sensor modules arrived today. I assembled the shield and started to lay out where things will go.
In the photo, the modules are just sitting in place. I need to get some headers so they can plug in before I go further. I have some on hand, but they are fairly high and would make everything stick up too high, so I ordered some low-profile ones.
Some space between the modules and the breadboard will be used for things like level converters for the data lines from the ESP8266 wi-fi module and a seperate 3.3v power supply for it. Waiting on more parts for that to arrive too.
The black line on the board is where I have to keep clear because the USB jack and power jack on the Arduino Mega sit below there. If I solder any parts in above the USB jack they will short out to its case. The two RJ-11 jacks for the wind/rain gauges will mount just behind the line with the body of those jacks extending out over the line on top. If you look closely at the photo up above of the Uno-sized board, you will see those jacks there.
It looks like everything will fit easily with careful planning. (Famous last words. It is really tight.)
This will give sensors for Wind Speed, Wind Direction, Rainfall, Temperature, Humidity, and Barometric pressure, along with GPS data – latitude/longitude, time and altitude.
More updates:
 Progress continues and the weather station is starting to approach it’s final form.
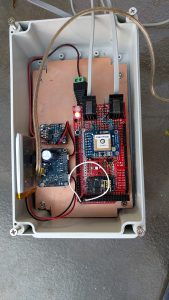
The homebrew Mega Weather shield is nearly complete. There are one or two modifications that I might make, but they don’t stop me from using it now.
As you can see, it is now mounted in a plastic box along with the solar battery power stuff. I’ve been running it outside on my deck to see how well the battery charging works and how long it will last overnight. I’ve decided to increase both the solar panel capacity and the battery capacity. I have ordered another solar panel identical to the one shown and will use both. I also have on order a larger lithium ion battery.
In bright sun, which has been scarce lately, the panel was able to charge the battery to full and keep it there while running the weather station. At night, the battery kept things running most of the night, quitting at about 4:30am. A bigger battery, 6600mah vs. 2500mah should be plenty to get through even a long night. Doubling the solar panel to 2 x 2W @6v will make sure the battery gets charged even on cloudy days. It’s pretty amazing how well it charges even when overcast, but you can’t have too much juice coming in.
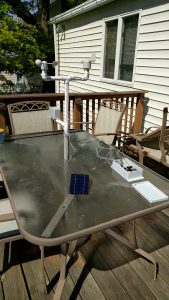
Here’s the wind meters connected to the electronics on my deck. The solar panel is just sitting there, propped up at an angle. Eventually, I will have to figure out how and where I want to mount them.
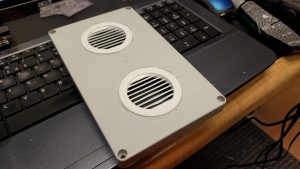
One other thing I need to figure out is ventilation for the box. You can’t get an accurate temperature with it in a hot box in the sun. You can’t read humidity unless it is open to open air, either. I want to find a way to ventilate the box so that it will get good circulation, but still be protected from excess moisture and pesky insects. We have tiny spiders that like to build nests in things like this.
I’m pretty happy with the programming now that I have it all working on the MEGA2450 and have plenty of memory to work with. I also have plenty of inputs and outputs too. I’m using three hardware serial ports, which make life so easy with the GPS and Wi-Fi connections along with the debug monitor.
I figured out how to use the EEPROM memory on the ATMega chip too. I can now store certain pieces of data that are long-term and reload them on boot up, if the board gets restarted. Things like daily rain total, and daily wind gust max can be kept.
I finally got the little ESP8266 breakout working on the homebrew sheild. It should have worked the same as on the Sparkfun wifi shield, (it’s the same chip) but I almost gave up on it. I finally began playing around with a sketch of just the ESP8266 and looping it back to the serial monitor until I got it to answer me. Some of the pins on the module were not really clear what they needed to have done with them, so there was some experimentation. But once I got it to respond to terminal commands (AT commands, just like the old Hayes modem commands) it began to work.
I also made a copy of the library for the ESP8266 module and altered it so that it could use a different set of pins for software serial. The ones used on an Uno were no longer possible on the Mega, due to them not having interrupt capability. Once I got into the library, I realized that you can tell it to use a different baud rate or to use hardware Serial1. I figured out how to add hardware Serial2 and it is working great that way.
That is one of the things that are a pet peeve of mine about Arduino libraries. You get a shield or device that comes with a library you install to use it. The library usually comes with some example sketches that might show you how it works. You play around with them and think you have an idea of how to use it, but then you see someone elses’ sketch using it and they throw things in that you just say “how did they know to do that?” A simple list of calls to the library and the parameters it accepts would make life so much easier. The best example I have seen is the TinyGPS+ library that I am using for GPS. The author provided some good example sketches the show the basics, but then threw in an example called “kitchen sink” where he demonstrates every possible function and explains in the comments what they do. Every library should have that!
Even More Updates:
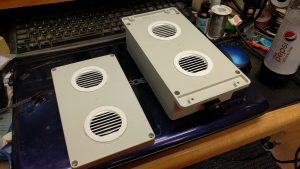
While waiting for the second solar panel and bigger battery, I located some ventilation solutions. I picked up some 2″ soffit vent louvers at Home Depot. I put two in the front cover and they worked out so well, I put two in the back. I hope they will do the trick. It’s a fine line between keeping rain out an letting the humidity in. I cut them down so they don’t stick far into the box, and then glued them in place with silicone caulk.