Warning: Ham Radio-related content. If that bores you, better steer clear of this post.
I don’t know what inspired me to do it, but I have undertaken the construction of a portable antenna for my Ham Radio operations. Probably just for something to do, or curiosity to see if such a small antenna can really be effective.
I usually use some method of shooting a wire up into tall trees for this type of operation, camping or just operating “Field Style” for fun. I’ve been pretty happy with the fishing-reel-on-a-slingshot method and I built a Pneumatic Launcher that can be very effective at putting a line over even the tallest of trees. I’ve also acquired some telescopic fiberglass masts (fishing poles) that work quite well as supports for vertical wires. But this design caught my eye and I decided to try it and see.
 The idea come from a web page that I saw mentioned on the QRP-L email list: VE3GAM. There are commercially-made antennas that are similar, but this looked easy to make. It might be fun to try.
The idea consists of a shortened dipole on a portable mast and tripod that can be disassembled when not in use. The central portion of the antenna is built using a plastic electrical box and some aluminum tubing. Loading coils are made out of plastic PVC conduit and tapped for the various bands. Further tuning from band-to-band is done by varying the length of the ends of the dipole, which are made out of long telescopic whip antennas. Think of rabbit ears or a transistor radio antenna, but longer.
The materials were an eclectic collection. I wasn’t going to find them all in one place, that was for sure. I started researching where I could acquire them online and once I was certain I could get them, began ordering the parts. My first assumption about what would be hard to find and what would be easy was pretty much 180 degrees out of whack, as usual.
I was concerned about finding a small quantity of the aluminum tubing. I envisioned having to buy 20 foot lengths and paying an outrageous amount for shipping such a large item. It turned out to be no problem. I found an outlet online that would not only sell me exactly what I needed, but would cut it to length and ship it to me. When I got to the shipping part, they had an option to pick it up at the nearest store. Even four-foot lengths were going to cost me $24 to ship, so I checked out where the closest store might be. It turned out to be in Buffalo. I can drive to Buffalo for a lot less than $24, even at current gas prices, so I did and combined the trip with a stop at Harbor Freight for a tool I would need, a pipe threader to groove the PVC for the coils.
7 Band Portable Dipole Antenna from Bob Rice on Vimeo.
Some things I thought would be easy weren’t, of course. The PVC plastic electrical box for the center of the antenna was something I thought I could just walk into Home Depot and pick up. Of course, it wasn’t. I ordered one online from Grainger, along with a few minor hardware things, nuts and bolts mostly. They were delivered very quickly. The box turned out to be useable, but just fit. The video warned about boxes where the conduit openings were too low to clear the bottom of the box. This one was useable after I ground out a few bumps in the plastic. I got lucky. The video showed one that was totally unuseable.
A source for the telescopic whips was given in the video, but no longer carried them. I found I could order some slightly longer (Longer is good. Shorter would be a problem.) ones from the Ham Radio standby, MFJ. They had a larger base (3/8-24) and had a male end, rather than the female end on the ones in the example, so I adjusted the purchase of bolts to fasten them to the ends of the coil. I would use some coupling nuts to joint the bolt to the threaded end of the whip. Another item I could pick up at Home Depot. Not! They didn’t carry the fine thread, only 3/8-16. I had a online source and resigned myself to waiting for them to arrive. On a hunch, I went to Sears Hardware and I found two of them in their nut & bolts department. They were charging over $3 each, but I had them in my hand now. So I was ready for the whips. Of course, I got an email from MFJ telling me they were on backorder and might take two weeks to arrive….
It seems like every step of the way there is some problem that challenges the completion of this project. Of course, this is not unexpected. In fact, it’s kind of the challenge that makes these projects interesting. The change to the 3/8 bolts to attach the whips meant that the plugs that fit inside the end of the coil forms won’t be large enough. No problem, I’ll use a PVC cap that fits over the end instead of inside. As soon as I can find some. All I can find are threaded, no press and glue caps in Home Depot. I may just use the threaded ones, now that I have a pipe threader. I’ll just thread the 3/4 PVC. I already threaded the entire length of it to form grooves for the wire coil, but with a 1-inch die shimmed down a bit. It just made shallow grooves for the wire, but the full pipe threads should line right up.
The article called for some 10-24×15/16 standoff spacers in the box to attach the aluminum pipes. The closest I could find was 10-32×1. Not a big difference and I should be able to make them work, but that changed all the small hardware from 10-24 to 10-32. There was so much to get right before I ordered anything at all. Even wire had to be ordered as it required 33 feet of 20ga. wire for each coil. More than I had around, but less than a full spool by a lot. I found a place that sold a 160 ft. roll. Perfect, but I’m still waiting for it to arrive from a small place that looks like a CB repair shop.
But progress has been made and as the rest of the parts arrive, it will all go together. I’ll let you know how it works when it is done.
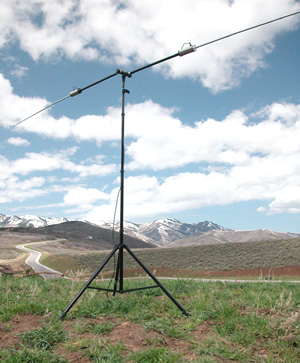 The commercial equivalent product (seen here) costs $400. I’m well below that, but already more than I expected to spend. We’ll see how badly I do in that department later as well. But the fun is priceless!


The parts are trickling in. Today two packages arrived with the wire and the standoffs.

The only thing lacking at this point is the telescopic whips, which MFJ had estimated taking two weeks. I found a dealer that had them in stock, so I cancelled the MFJ order and ordered them direct from the dealer. Funny thing is, that saved me money because the shipping was cheaper. They should arrive next Wednesday.
Well, the coils are done and one of the two MFJ whips arrived today. I assembled the 3/8-24 hardware and glued the caps on tonight.
The larger end on the telescopic whips necessitated abandoning the internal plug and going with the external PVC cap. It all worked out fine.
I have to drill the aluminum tubing tomorrow and assemble it into the octagon box.
Then I will be able to put the couplings on the coils and finish up.
I picked up some 3″ PVC to make up a balun coil like shown on the VE3GAM site.
Instead of the heat-shrink tubing, which I didn’t have any large enough, I simply put a coat of the PVC adhesive around the end of the coils to hold the wire in place. It seems to be enough.
The antenna is all built. I’m just waiting for the second whip to arrive. I also need to build a balun. I’ll set it up and try it out on my deck. I have a TV tripod and some mast I can lash up into a stand. I’ll take some pictures then as well.
Bob Rice, the author of the excellent video that showed how to make the antenna wrote to give his email address in case anyone has questions: bobrice2@sympatico.ca
It seems like his antenna design has quite a few fans.
======================================
It seems the comment window has expired and I can’t add a new comment, so I’ll tack this on as an edit to the last comment.
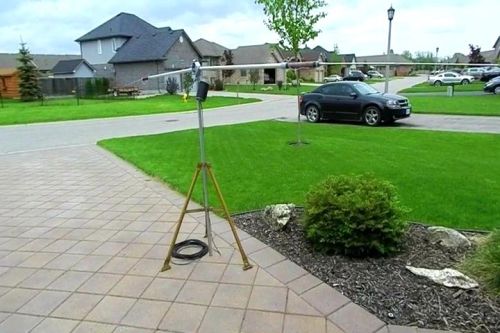
I just got through using this antenna for Field Day 2012. I operated 1E with battery/solar power from my deck. I set the dipole up on top of a 10 foot piece of TV mast in the corner of the deck and let it lean on the railings. This is the same setup as you saw in the photos when I was building it, just higher.
I used it as my antenna on 20 and 15 meters and I felt it performed great. It wasn’t the equivalent of a yagi, but it made contacts. 127 QSOs on 20M and 9 on 15M. Not bad for a part-time effort and QRP.
I want to pick up a portable tripod and a mast to take it out portable. I’m thinking of one of those PA speaker tripods and a Jackite pole. Others have reported they work well. It’s too big and heavy to put on my bike, but I’ve got wire antennas for that scenario.
I know it’s been a long time, but I’m revisiting this article. I’ve gotten interested in POTA and portable antennas have become a valuable tool again.
I want to use this antenna for some park activations. To facilitate that, I picked up a tripod and plan on getting a sturdy telescoping pole for it, something like a painters pole.
I bought a speaker stand on EBay for around 20 bucks. These are used to elevate PA speakers by bands for live performances. They are quite sturdy and made to support a lot of weight. You can get brand new ones for around $50. Either is quite a bit cheaper than the tripods that the Ham antennas makers supply.
Another tip I received was for a similar tripod being sold in big-box hardware stores as a base for portable lighting.
One other thing I am planning is to replace the big, bulky, coax choke and replace it with a series of ferrite beads. That will make installation on a pole easier.
So, I hope to dust off the rotatable dipole and put it use here soon.