I’m remodeling a bathroom in my house. My daughter wants to use the room next to it as a bedroom, so it’s time to get working on it. I’m progressing slowly and trying to not get in over my head.
The facilities have not been used for some time. The sink and fixtures were quite old and had been leaking until they got so bad I shut them off. The shower/tub had been out of commission for a few years because the clean out on the drum trap had rusted out. I went into the basement one day to find water falling to the floor as my son was singing in the shower. A quick and dirty repair to try and fix it didn’t drain properly, so it’s been unused since.
Finally, the toilet started leaning to the side and I shut that off. The floor was rotting out and sagging.
Recently, I started working on it. The sink and vanity have been removed. They will be replaced with new ones. The toilet has been removed and the insides removed. I’ll rebuild it and reinstall it eventually. The toilet is not that old, maybe 15 years.
So I started in on the floor. Layer after layer was ripped up over the course of weeks. I’d work on it a little at a time. There were several layers of linoleum, luan, plywood, paper, cedar shingles, tapered shims, and pine flooring. I finally got down to the lowest layer and started to remove the rotted area. I soon decided to replace the entire floor from wall to wall to tub with new plywood. We haven’t decided what will go over that yet, but will have to soon.
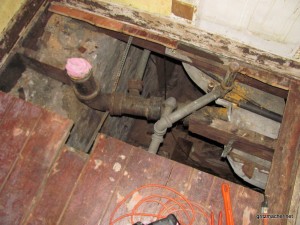 This is what the floor looks like today.
You can see the cast iron sewer pipe running across the opening. The toilet sat where the old pink towel is plugging the opening. Galvanized 1 1/2″ pipe went to the sink and tub in the middle of the picture.
As you can see, they cut about three feet of the floor joist out to make way for the sewer. Unfortunately, they did nothing to reinforce the structure afterwards. No wonder the toilet began to lean to one side. This has been there for probably 50 years or more.
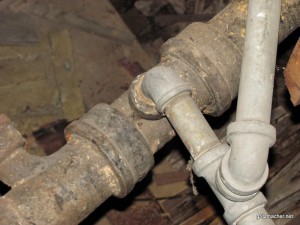 This is how the pipes ran from the sink and tub. The line from the tub comes in at the bottom and cuts through the cut out section of the joist. The sink drain came in on the top of that. It all dropped into the iron pipe through a street el.
One thing that held me up in repairing this is how to connect new plumbing (PVC) into the old system. In the past, I’ve simply cut the galvanized pipe somewhere and used a rubber Fernco coupler to join the pipes. This works well when they are of similar diameters, but here, I prefer to go into the top of the iron drain pipe. I didn’t know how that should be done.
 Anyway, I did some research and found out the proper way to do it. They make a rubber donut seal that fills the space around a PVC pipe and the opening in the iron pipe. All I need to do is find one the right size.
So I cut the galvanized pipe out today from next to the el to where it goes under the floor. I’ll remove the rest back to the tub later from in the basement. Now I need to get the el out of the iron pipe flange. I might be able to break it free with a pipe wrench, it is threaded where it is in the lead, but if not, I’ll cut it and break the rest out with a chisel and hammer. They also recommend drilling holes in the lead around in a circle until you remove enough to break that up. I did something similar removing the toilet flange, except the chisel was all I needed. The flange broke and came right off the lead. Since the lead is around the outside of the pipe and the repair flange goes inside, I don’t even need to worry about removing the lead there.
 I’ve learned a bit about lead and plumbing lately. They are really pushing to eliminate it everywhere. I had to put a shut-off valve in the cold water line that went to the sink. Part of the pipe was galvanized but it was copper up to about six feet from the bathroom. I decided to cut it at the transition and put a valve in there. I had thought there was a shut off valve already, but it was leaky, because the end of the pipe where I disconnected it would ooze a little drop of water every so often. When I looked in the basement for it, there was no valve, even though there was one for the hot water. The line was so rusted up, it was clogged.
So I went ahead and soldered a new valve in place. It had to be almost the lowest place in the house and it took a long time to get all the water out of the system so I could solder it. I had to shut off water to the whole house and drain the pipes to do it. Eventually, I got it done after I blocked the pipe up so the last few drops weren’t running out the end and cooling it off. Old fashioned lead-based solder worked better, but I didn’t have much problem with the lead-free solder.
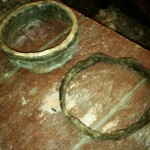 The cast iron drain pipes are put together with lead as well, but I don’t think they are really a problem for lead contamination. At least not until you remove them and send them to a landfill. The joints are what they call lead and oakum caulking. The lead is kept from seeping into the pipe by the oakum, a tarry fiber string material they wrapped around the joint first. I’m not sure if the lead was melted into the joint with a torch, or hammered in place, or both, but the lead never actually comes in contact with the water in the pipe. It is just a cement. Of course, you don’t drink the sewage water, at least not today. Hopefully, it’s treated first, but lead isn’t being added to it by the cast iron pipes.
Anyway, this will be an ongoing project for a while. Getting the plumbing out of the way is the first thing. The next thing to do is reinforce the floor and level it so the plywood will lay right. I’ll box in the open part where the joist was cut and put a short joist on either side of the toilet drain. I’ll also scab some new joists onto the side of the existing ones and bring them up to the level I need to make the floor level and match the other flooring. It sounds more complicated than it is. I hope.
Update: Today, I cut the last of the galvanized 1.5 inch pipe out. I cut the elbow off at the cast iron fitting and with a lot of hammering, chiseling and cutting with the sawzall, got it out of the pipe.
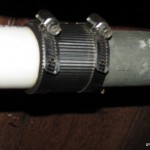
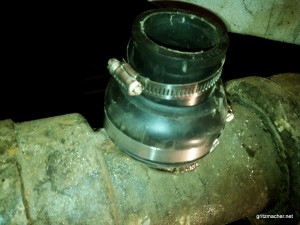 I went to Home Depot to get a “donut” gasket. They had one for 2″ pipe, but nothing smaller. Rather than drive around from place to place looking for one, I did what the guy there suggested and got a Fernco adapter that was for 2″ to 1.5″ PVC. Actually, I took a larger one along as well, just in case. After softening up the rubber by sitting it in a pan of boiling water, it was easy to stretch it over the outside of the iron hub. The stainless steel hose clamp didn’t fit, but I got a larger one when I returned the larger adapter that I didn’t use.
It worked well as you can see in the photo. This is as far as I am going to take the plumbing for now, until I get the floor started. Once the flooring is down and I know exactly where the new vanity and sink will go (It’s going to be within a few inches either way. There just isn’t that much room to put it anywhere else.) I will drill holes and run plumbing through the floor.
So, next step is rebuilding the support structure with 2×8 material and getting it level and at the right height so we can put in a floor.
Further Update: I completed the sewer plumbing. I decided that it would be easier to do before the floor work. The water supply lines are easier and I can do them afterwards.
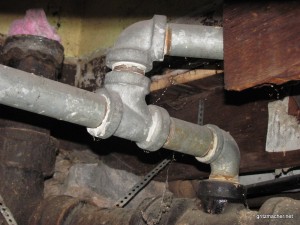
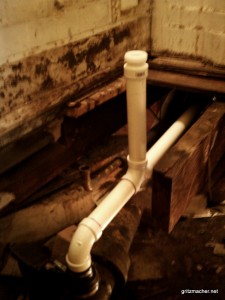 This is the completed run. The only thing not glued yet is the vertical piece. I left that unglued so that I can take it out and fit the floor first. I’ll cut it to length and glue it once the floor is in and I’m ready to hook up the sink.
I decided to run the pipe from the tub through the joists underneath the the tub. It mad the run easier and let me route it higher so it can drain downhill better.
I had to drill three joists to do that. The old joists are rough cut, so they’re a full 2″ X 10″ and there is plenty of material left for strength. I had to buy a hole saw big enough for the pipe and I also picked up a 90-degree drill attachment. It was a bear to handle, working overhead, and there were some tight spots, but it got done. The joists are thick enough that I couldn’t drill through in one pass, I had to drill in from both sides and meet in the middle. Even the pilot bit didn’t go through, so I had to drill that through separately with a longer bit so I could line it up.
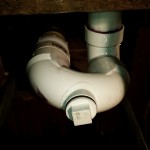 Here’s the P Trap under the tub. I hope I never have to deal with this again.
I should be able to pour water down the drain of the tub, at this point, so we can get that cleaned up and start in on it.


As a side note, every bit of the 1.5″ galvanized pipe that I removed was chock full of crud. There was probably the equivalent of a 3/4″ pipe for water to pass through.
While I had the top open and with the 4″ opening for the toilet next to me, I spent some time with a snake and water running from my kitchen sink (which drains into this same area) and cleared it out. I got the snake in far enough that it was nearly to the vertical section of the standpipe. It took a lot of work, but I could easily see the water flow and gauge how much improvement there was.
At one point, the snake must have pushed some sediment into a narrow point and the water came up and overflowed at the top opening where I put the new fitting. I put my foot over it to plug it and kept working the snake until it broke free.
It now all flows very quickly and the drainage from the kitchen hardly slows. I’ve had trouble with the kitchen line near this point in the past. Next time, the last section of galvanized will come out and be replaced with PVC.
Ed Stuckey stuckey@aristotle.net left a comment on my contact page. I wish I had a way to move it to the post, but I’ll just cut-n-paste instead. Thanks for the comment, I love it!
It was an old article about ‘nightmare plumbing’ when remodeling a bathroom.
You said: The joints are what they call lead and oakum caulking. The lead is kept from seeping into the pipe by the oakum, a tarry fiber string material they wrapped around the joint first. I’m not sure if the lead was melted into the joint with a torch, or hammered in place, or both, but the lead never actually comes in contact with the water in the pipe. It is just a cement.
I can assure you from experience as a child playing and watching while my uncle plumbed using this technique. He had a plumber’s blow torch which burned kerosene and held a cast iron pot with a spring wire handle. The lead was melted in the pot and poured as a liquid into the joint. The oakum was packed into the joint first to keep the molten lead from flowing through the joint being made. The oakum wasn’t so much tarry as it was oily. I still have a few pieces of it lying around. The tarry look probably comes from years of waste water in contact with it.
Any joints that faced horizontally had to be made-up with the pipe laying down and the joint face-up. After these sub-assemblies were fabricated the pipes were placed into position and final facing-up pours made to finish the job.
Plumbers at that time had to know what they were doing and exactly how and where everything went before even starting.